|
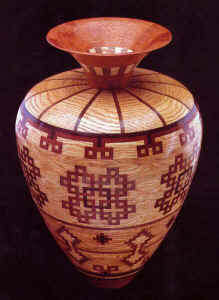
Celtic Mood
This page describes some of the details of the construction of this
vase. Unfortunately at the time of construction I did not take as many
photos as I would have liked to, so there are only a few detail shots.
'Celtic Mood' is a 13 1/2" diameter, 19" tall vase. There
are 2164 pieces of wood glued together to make up the vase. There are 4
types of wood - Padouk (red), Walnut (brown), African Blackwood (black),
and Oak (the background). Construction
of this vase took about a month, working almost every day.
|
|
I started with a detailed, full-sized drawing of the shape and
patterns. This design work was done over a period of a couple of months.
There were lots of ideas about patterns, colors etc. that took some time
to decide upon. I used a 1/4" grid paper and constructed the entire
vase (with the exception of the base and part of the top) from 1/4"
thick segments.
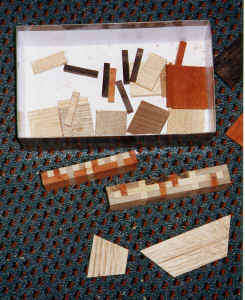 I did most of the cutting ahead of time. I used a simple jig on my
table saw to accurately set the width of the small pattern pieces. As
can be seen from the closeup photo of the celtic knot pattern, the
pattern is made up of pieces which are multiples of the 1/4" base
pattern width. These need to be cut very accurately in order to get the
visual effect of the knot to work. I did most of the cutting ahead of time. I used a simple jig on my
table saw to accurately set the width of the small pattern pieces. As
can be seen from the closeup photo of the celtic knot pattern, the
pattern is made up of pieces which are multiples of the 1/4" base
pattern width. These need to be cut very accurately in order to get the
visual effect of the knot to work.
The knot patterns were pre-constructed into horizontal assemblies of
2 or 3 rows. This assembly was constructed on the workbench, and clamped
tight to minimize glue lines. The top, bottom, and sides could then be
lightly sanded on a sanding disk to eliminate any slight
unevenness. This was by far the most tedious part of the process.
The pattern had to be followed exactly in order to get the final 'knot'
effect. (More than one 'mistake' is still kicking around my shop!)
This photo shows some of the construction pieces and partial
assemblies. I started all the walls with 1 1/2" wide pieces. This
was later turned down to a finished wall thickness of around 3/8".
|
| Once the major knot pattern assemblies were finished, I began
constructing and turning the vase. I constructed this vase in 4 separate
pieces. The individual pieces were glued and turned to about 5/8"
wall thickness. At this stage, the full-scale drawing is particularly
important. I could measure both the inner and outer diameter of each
ring. Before assembling the 4 main pieces, I turned the interior to it's
final finished size and sanded. The 4 pieces were then glued together. I
could then mount the entire vase between centers on the lathe and turn
the outside to it's final form and finish.
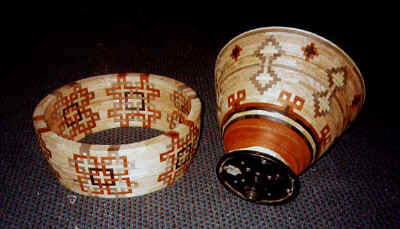 This
photo shows two of the four sub-assemblies. This
photo shows two of the four sub-assemblies.
The assembly with the 6 celtic knots was constructed and turned by
temporarily attaching it to a 14" diameter MDF disk which was
mounted on a faceplate. Note that the completed rings are a combination
of celtic knot pattern pieces which are cut at 90 degrees, and 'filler'
pieces of oak that are tapered. The entire celtic knot assembly is in
fact made up of 'square' pieces. This enables one to accurately align
the pattern vertically.
When most segmented-ring construction is done, the individual rings
are all glued together at once, then the entire ring glued to the row
below it. For this project I was most concerned about the vertical
alignment of pieces within the celtic knot pattern. I actually glued
each knot sub-assembly (the 2 or 3 row high pieces in the previous
photo) on separately, clamping it securely to the row below. This way I
could accurately align it with the piece below. Once the glue had set, I
fitted the tapered oak 'filler' pieces between the pattern assemblies.
(This often required some slight adjustment to the angle on the oak
pieces, which I did with a disk sander). |
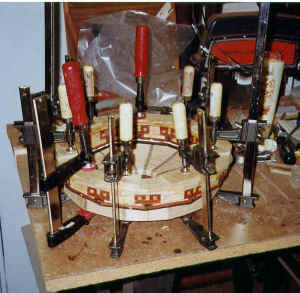 The photo
to the left shows several of clamps used to hold on one of the layers
on the upper assembly. The top has about a 2" hole in it where the
final vase spout will be inserted. This hole was used during
construction to hold the piece with a scroll chuck so that it could be
turned and shaped. The photo
to the left shows several of clamps used to hold on one of the layers
on the upper assembly. The top has about a 2" hole in it where the
final vase spout will be inserted. This hole was used during
construction to hold the piece with a scroll chuck so that it could be
turned and shaped. |
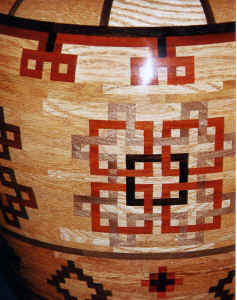 This
final photo shows a closeup of the celtic knot pattern. There are
about 200 pieces of wood in each of these knots. The under-over knot
effect is critical to the overall result. It is also the part that
nearly drove me mad with frustration! More than once I came back to the
shop the next morning to find that I'd somehow messed up the pattern.
I'd then have to chip, cut, break, or turn off the offending pieces and
start again. The whole pattern was made more complicated by
interchanging the red padouk and the brown walnut on every second
knot. (I believe the appropriate term for this is 'glutton for
punishment'...) This
final photo shows a closeup of the celtic knot pattern. There are
about 200 pieces of wood in each of these knots. The under-over knot
effect is critical to the overall result. It is also the part that
nearly drove me mad with frustration! More than once I came back to the
shop the next morning to find that I'd somehow messed up the pattern.
I'd then have to chip, cut, break, or turn off the offending pieces and
start again. The whole pattern was made more complicated by
interchanging the red padouk and the brown walnut on every second
knot. (I believe the appropriate term for this is 'glutton for
punishment'...) |
|